
OAuth2: Authorization-Server (인증 서버)
개요
요즘 사용하는 대부분의 web, app 에서는 사용자를 인증 하고 그에 맞는 권한을 부여하여 자원에 접근가능하게 한다.
이러한 인증, 인가는 보안에 있어서 가장 핵심적인 문제이고 설계부터 신경을써서 해야한다.
애플리케이션만의 고유한 인증, 인가 체계가 존재한다면 좋겠지만, 필자의 경우에는 여러개의 앱,웹 애플리케이션에
독자적인 인증,인가 기능 구현에 시간을 쏟는것보다는 독자적인 Auth Server 를 통해 비지니스에 집중하기 위해 서버를 만들기로 결정했다. 또한 이렇게 구현했을때의 장점도 존재한다 SSO(Single Sign on) 을 통해 한번의 로그인으로 여러개 사이트에 접속하여 이용할 수 있다는것이다.
그렇다면 비슷한 역할을 해주는 다른 프로그램이 없을까? 존재한다.
Keyclock 이라는 오픈소스를 활용하면 된다. ID, 엑세스 관리를 수행해주는 오픈소스이고 SSO, Token 발급 등 인증, 인가에 대해서
거의 모든 기능을 구현되어있는 소스이다.
하지만 필자는 KeyClock 의 모든 기능을 사용하지않고, 오버 엔지니어링 이라고 판단되어 독자적인 소규모 인증서버를 구축하려고 한것이다.
필요하다면 KeyClock 도입을 고려해보자. docker 로 간단하게 서버를 띄울 수 있기에 시간은 오래걸리지 않는다.
Keycloak
Single-Sign On Users authenticate with Keycloak rather than individual applications. This means that your applications don't have to deal with login forms, authenticating users, and storing users. Once logged-in to Keycloak, users don't have to login again
www.keycloak.org
spring authorization server ?
Spring Security 팀에서는 기존에 Authorization Server(인증 서버)를 지원하고 있었다. 하지만
2019년 11월 공식발표에서 Spring Security 에서 OAuth 인증서버를 지원하지 않는다고 발표했다.
-> 인증 서버는 jwt, SAML, ldP, LDAP 등 Libs 로 이루어지는데, Spring Security 프레임워크는
라이브러리나 제품을 빌드하는 사업이 아니라고 판단했기 때문이다.
https://spring.io/blog/2019/11/14/spring-security-oauth-2-0-roadmap-update
다만 해당 발표에 대해서 수많은 커뮤니티와 유저들의 반대와 반발이 있었으며, Spring Security 팀은 이러한 의견들을 수용했다.
Spring Security 에서는 제외하고, 인증서버 용도의 Spring-authorization-server 를 2020년 04월에 새롭게 발표하게 되었다
https://spring.io/blog/2020/04/15/announcing-the-spring-authorization-server
결국 Spring-authorization-server 는 사용자 인증, 권한부여, 토큰 발급등을 수행하는 인증서버의 역할을 수행한다.
Version
spring-authorization-server 는 1.0.0 버전 부터는 Spring boot 3.0^ 이상 지원되는 항목이다.
3.0 미만 버전은 0.4.0 또는 0.4.1 버전을 맞춰서 사용하면된다.
implementation 'org.springframework.boot:spring-boot-starter-oauth2-authorization-server'
spring-authorization-server 에서는 간단하게 yml 파일만 구성해도 동작 할 수 있다.
인증서버를 구성하는 최소한의 설정들이다.
server:
  port: 9000

logging:
  level:
    org.springframework.security: trace

spring:
  security:
    user:
      name: user
      password: password
    oauth2:
      authorizationserver:
        client:
          oidc-client:
            registration:
              client-id: "oidc-client"
              client-secret: "{noop}secret"
              client-authentication-methods:
                - "client_secret_basic"
              authorization-grant-types:
                - "authorization_code"
                - "refresh_token"
              redirect-uris:
                - "http://127.0.0.1:8080/login/oauth2/code/oidc-client"
              post-logout-redirect-uris:
                - "http://127.0.0.1:8080/"
              scopes:
                - "openid"
                - "profile"
            require-authorization-consent: true
하지만 대부분의 사용자들은 최소한의 설정으로는 원하는 기능을 구현하기 어려울것이다.
이럴경우 Spring Security 설정하듯이 구성할 수 있다.
SecurityConfig.class
@Configuration
@EnableWebSecurity
public class SecurityConfig {

	@Bean
	@Order(1)
	public SecurityFilterChain authorizationServerSecurityFilterChain(HttpSecurity http)
			throws Exception {
		OAuth2AuthorizationServerConfiguration.applyDefaultSecurity(http);
		http.getConfigurer(OAuth2AuthorizationServerConfigurer.class)
			.oidc(Customizer.withDefaults());	// Enable OpenID Connect 1.0
		http
			// authorization endpoint
			.exceptionHandling((exceptions) -> exceptions
				.defaultAuthenticationEntryPointFor(
					new LoginUrlAuthenticationEntryPoint("/login"),
					new MediaTypeRequestMatcher(MediaType.TEXT_HTML)
				)
			)
			.oauth2ResourceServer((resourceServer) -> resourceServer
				.jwt(Customizer.withDefaults()));

		return http.build();
	}

	@Bean
	@Order(2)
	public SecurityFilterChain defaultSecurityFilterChain(HttpSecurity http)
			throws Exception {
		http
			.authorizeHttpRequests((authorize) -> authorize
				.anyRequest().authenticated()
			)
			// Form login handles the redirect to the login page from the
			// authorization server filter chain
			.formLogin(Customizer.withDefaults());

		return http.build();
	}

	@Bean
	public UserDetailsService userDetailsService() {
		UserDetails userDetails = User.withDefaultPasswordEncoder()
				.username("user")
				.password("password")
				.roles("USER")
				.build();

		return new InMemoryUserDetailsManager(userDetails);
	}

	@Bean
	public RegisteredClientRepository registeredClientRepository() {
		RegisteredClient oidcClient = RegisteredClient.withId(UUID.randomUUID().toString())
				.clientId("oidc-client")
				.clientSecret("{noop}secret")
				.clientAuthenticationMethod(ClientAuthenticationMethod.CLIENT_SECRET_BASIC)
				.authorizationGrantType(AuthorizationGrantType.AUTHORIZATION_CODE)
				.authorizationGrantType(AuthorizationGrantType.REFRESH_TOKEN)
				.redirectUri("http://127.0.0.1:8080")
				.postLogoutRedirectUri("http://127.0.0.1:8080")
				.scope(OidcScopes.OPENID)
				.scope(OidcScopes.PROFILE)
				.clientSettings(ClientSettings.builder().requireAuthorizationConsent(true).build())
				.build();

		return new InMemoryRegisteredClientRepository(oidcClient);
	}

	@Bean
	public JWKSource<SecurityContext> jwkSource() {
		KeyPair keyPair = generateRsaKey();
		RSAPublicKey publicKey = (RSAPublicKey) keyPair.getPublic();
		RSAPrivateKey privateKey = (RSAPrivateKey) keyPair.getPrivate();
		RSAKey rsaKey = new RSAKey.Builder(publicKey)
				.privateKey(privateKey)
				.keyID(UUID.randomUUID().toString())
				.build();
		JWKSet jwkSet = new JWKSet(rsaKey);
		return new ImmutableJWKSet<>(jwkSet);
	}

	private static KeyPair generateRsaKey() {
		KeyPair keyPair;
		try {
			KeyPairGenerator keyPairGenerator = KeyPairGenerator.getInstance("RSA");
			keyPairGenerator.initialize(2048);
			keyPair = keyPairGenerator.generateKeyPair();
		}
		catch (Exception ex) {
			throw new IllegalStateException(ex);
		}
		return keyPair;
	}

	@Bean
	public JwtDecoder jwtDecoder(JWKSource<SecurityContext> jwkSource) {
		return OAuth2AuthorizationServerConfiguration.jwtDecoder(jwkSource);
	}

	@Bean
	public AuthorizationServerSettings authorizationServerSettings() {
		return AuthorizationServerSettings.builder().build();
	}

}
위의 설정클래스는, 공식문서의 기본 제공 설정이며 이상태에서 서버를 시작하면 Test 진행이 바로 가능하다.
그렇다고 코드를 안보고 진행하게 되면,, 나중에 어떤값을 바꿔야 하는지 모를테니,,, 한번은 꼭 보는걸 추천한다.
"nimbus" 라는 라이브러리를 사용하여 Jwt 생성 및 Decoding 을 간편하게 사용할수 있도록 지원하고 있다
모든 부분이 다 중요하지만 대략적인 설명과 추후 수정될 내역에 대해서 간단하게 서술하겠다.
* spring IO Docs
https://docs.spring.io/spring-authorization-server/reference/getting-started.html
SecurityFilterChain
@Bean 으로 구성된 SecurityFilterChain 은 2개가 존재하며, 인증되지 않은 요청에 대해서는 모두 /Login 페이지로
redirect 시켜주기 위한 설정이다
UserDetailsService()
인증을 수행하기 위한 User 의 정보를 가져오기 위함이다.
기존의 Spring Security 에서의 Login 을 수행하고 id & pw 가 맞는지, 맞다면 UserDetails 로 넘기는 역할을 수행한다.
이 부분은 추후 DB 에서 데이터를 가져오는것으로 변경할 예정이다.
registeredClientRepository()
OAuth 2.0 인증을 사용하기 위해서는 Client 가 등록이 되어있어야한다.
Client 를 등록하는 이유는 인증된 Client 에게만 Token 을 제공할 수 있게 하는 작업이다.
실제로 OAuth2.0 으로 인증을 요청할때 사용자의 정보 뿐만 아니라, Client 의 정보에 대해서도 같이 요청을 하게 되어있다.
유저 정보, Client 정보가 하나라도 틀리게 되면 Reject 하기 때문에 중요한 작업이다.
Properties 에 보면 값이 많은것을 볼 수 있는데, 필수적인 값들만을 설정해 놓았으며 추가적인 설정으로 커스터마이징이 가능하다.
이또한 inMemory 로 되어있기에 추후에 DB 에서 가져오는것으로 바꿀 예정이다.
Test
Test를 진행하기전에 알아야할 몇가지 사항이 존재한다.
- 요청 Flow
- Auth 서버의 Endpoint
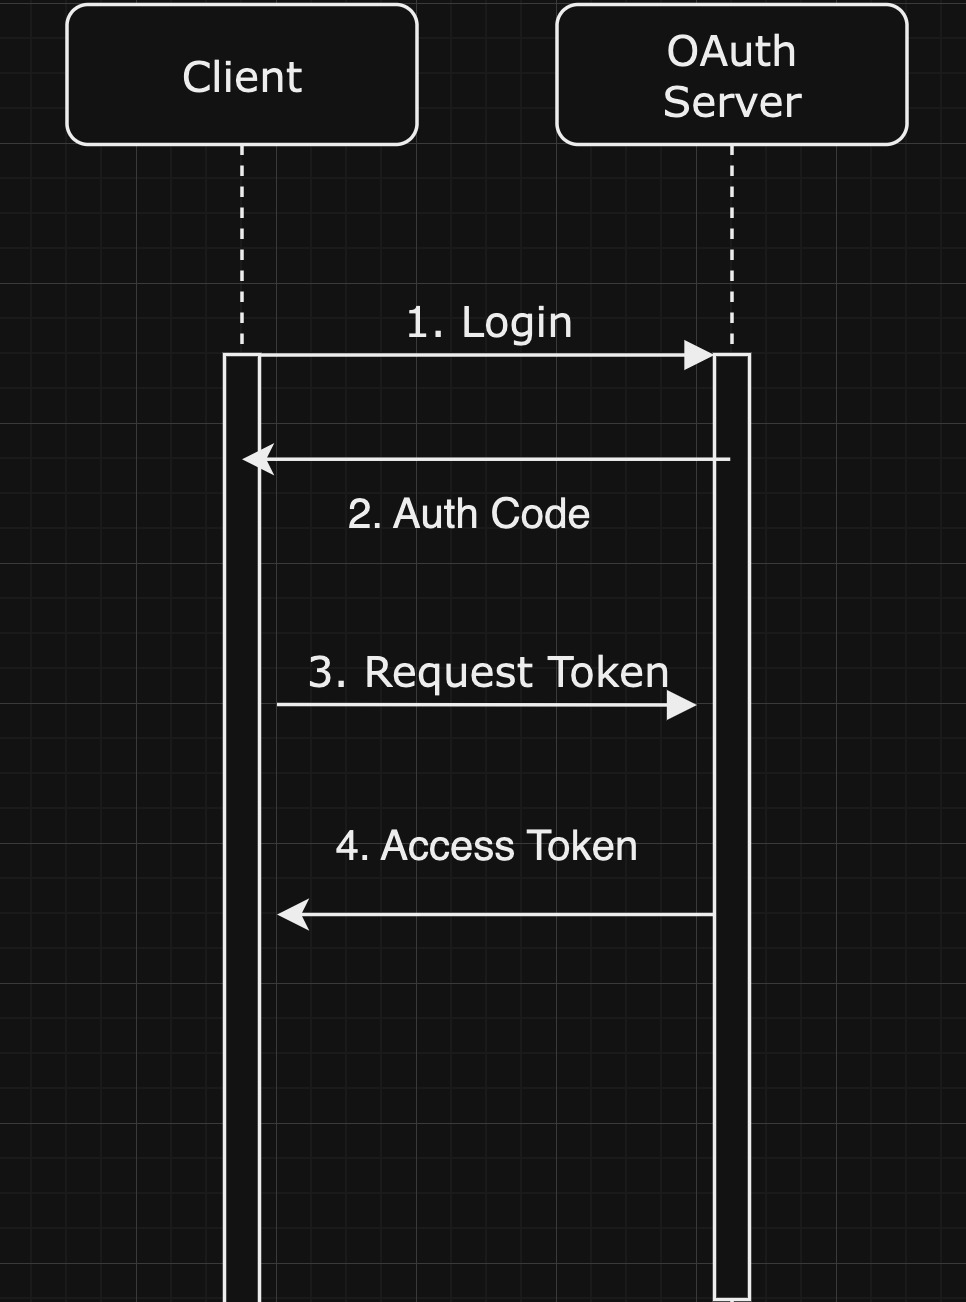
Client 와 인증 서버와의 Flow 는 이러하다.
1. 인증서버의 Login 페이지에서 로그인시, 클라이언트정보, Response Type, scope, redirect url 들을 요청하게된다.
2. 인증이 되었다면, 인증서버는 Client 에게 Authorization Code 를 발급한다.
3. Client 는 발급된 Auth Code 로 Access Token, Refresh Token 등을 요청하게 된다.
4. Auth Code 가 유효하다면 Client 에게 Token 을 발급하고 종료 하게 된다.
* 이때 Authorization Code 는 단 1번만 사용할 수 있으며, 유효시간이 매우 짧다.(주의!)
1. Authorization Code 발급
http://localhost:9000/oauth2/authorize?response_type=code&client_id=oidc-client&scope=openid&redirect_uri=http://localhost:8080
- 이때 파라미터의 값은 SecurityConfiguration 의 RegisteredClientRepository 를 참고하여 넣으면 된다.
값이 하나라도 다르면 401 이 떨어지기 때문에 파라미터를 잘 보도록하자(특히 Redirect_url 뒤에 "/" 까지도 인식한다)
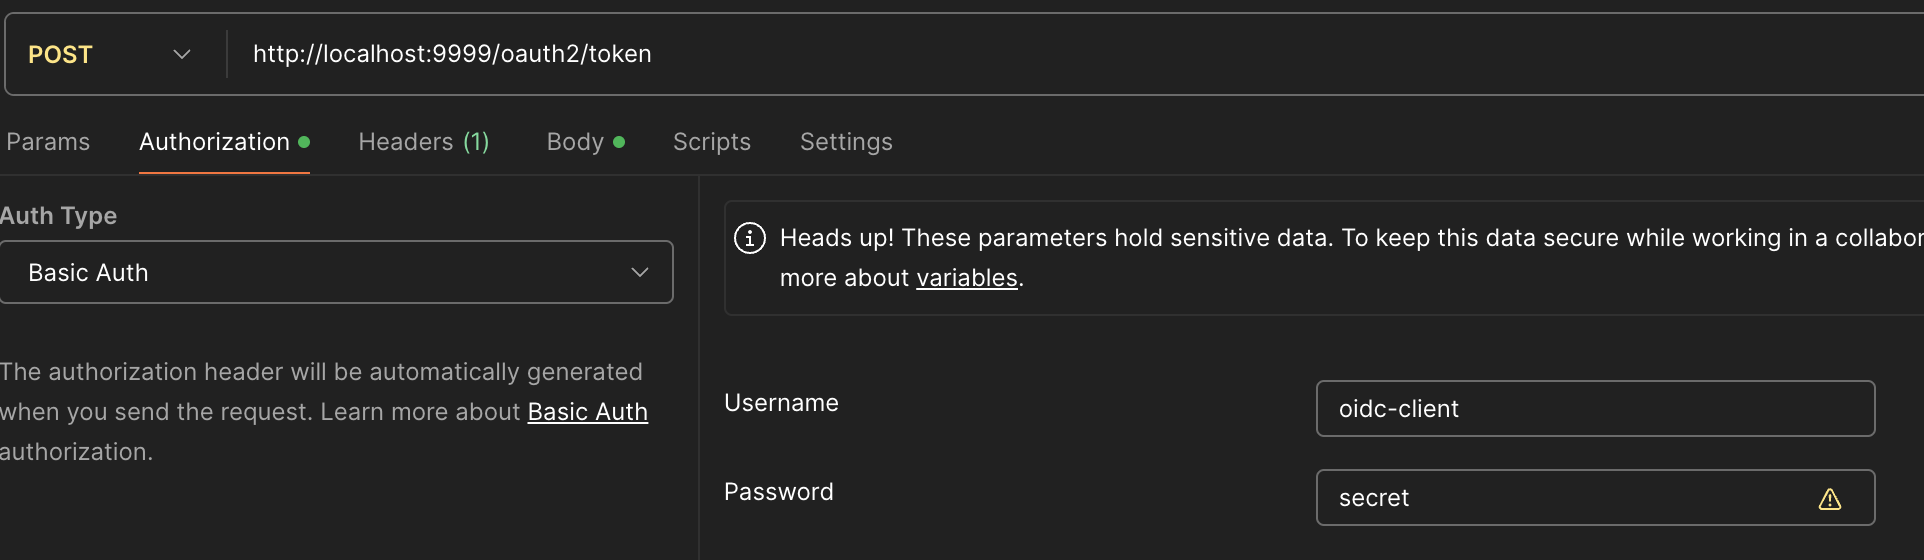
2. Token 요청
POST http://localhost:9000/oauth2/token해당 URL 로 Token 을 요청하게 되는데 이때 넘겨줘야 할 데이터가 많다.
Post Man 을 사용한다면 아래와 같이 해주면된다.
2-1. Basic Auth: Client 의 정보
2-2. Body(x-www-form-urlencoded): grant_type, code(Auth Code), scope, redirect_url
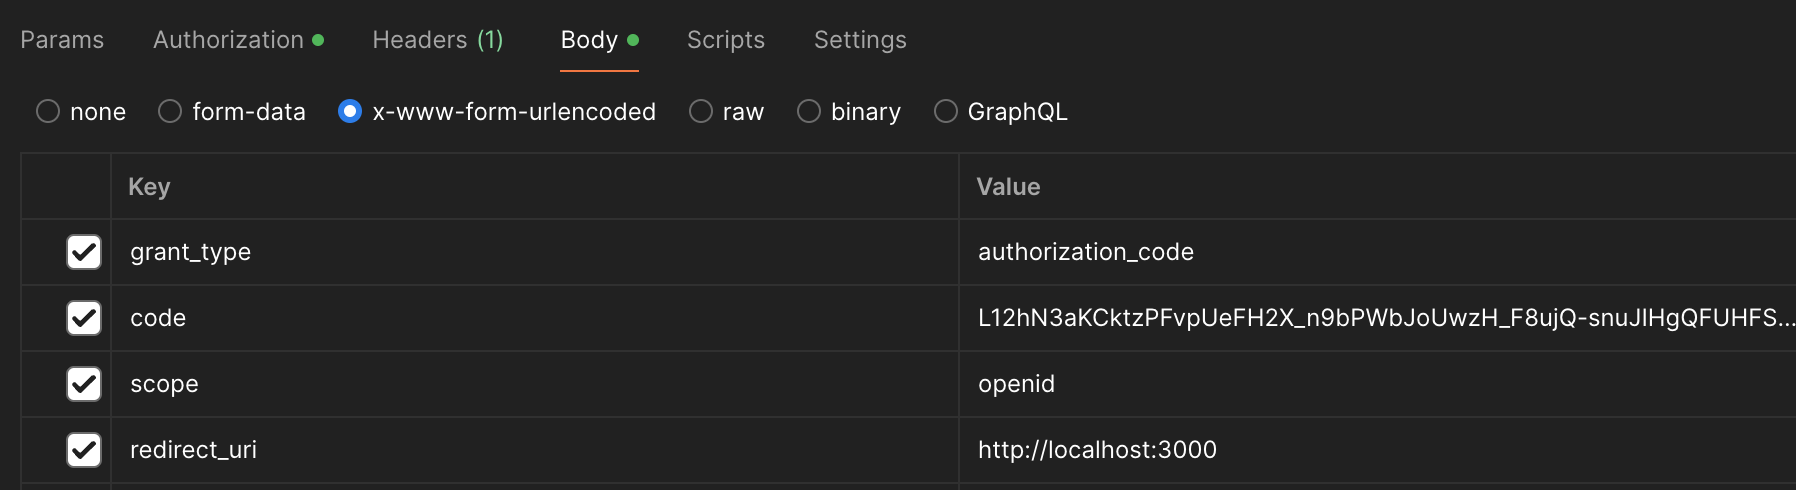
code 는 일회용이므로 인증실패시 재발급 받아야한다는것을 유의하자.
scope 는 샘플에서는 openid 만 있지만, openid profile 로 요청을 하게된다면, 유저의 프로필 정보또한 같이 요청할 수 있다.
3. Refresh Token 으로 Access Token 재발급
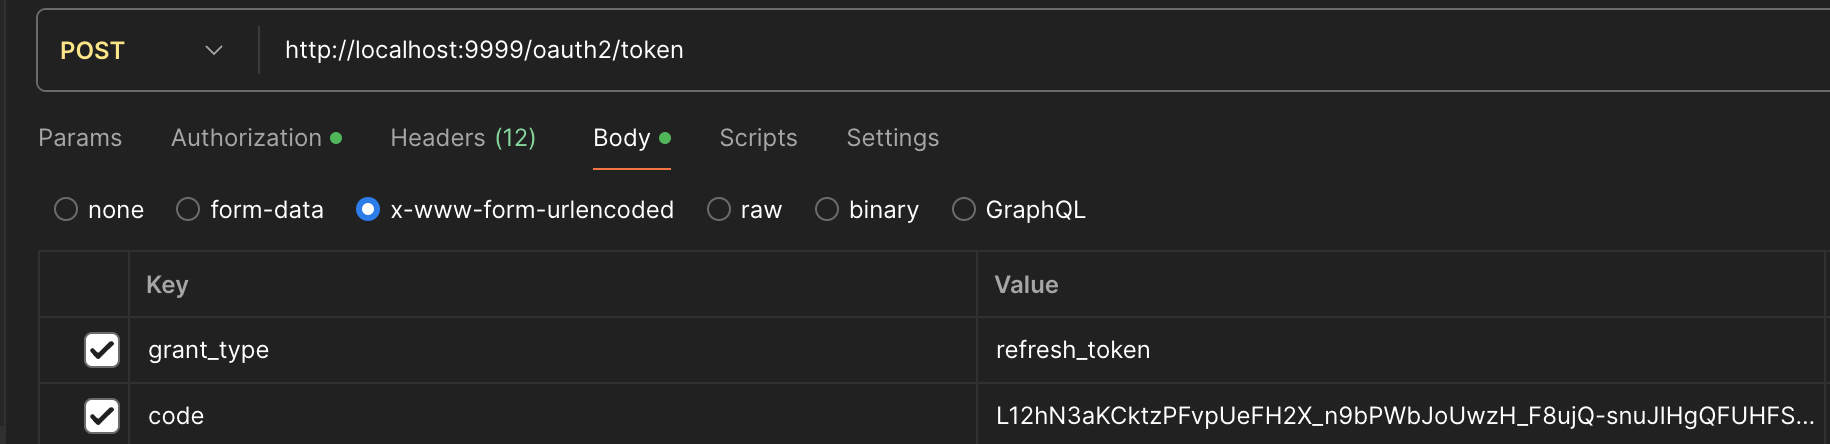
2번의 Token 발급 EndPoint 를 사용하며, 바뀐점은 Body 의 값이 2가지로 바뀐다.
grant_type 은 refresh_token, code 는 refresh_token 값으로 넣어서 요청을 보내면된다.
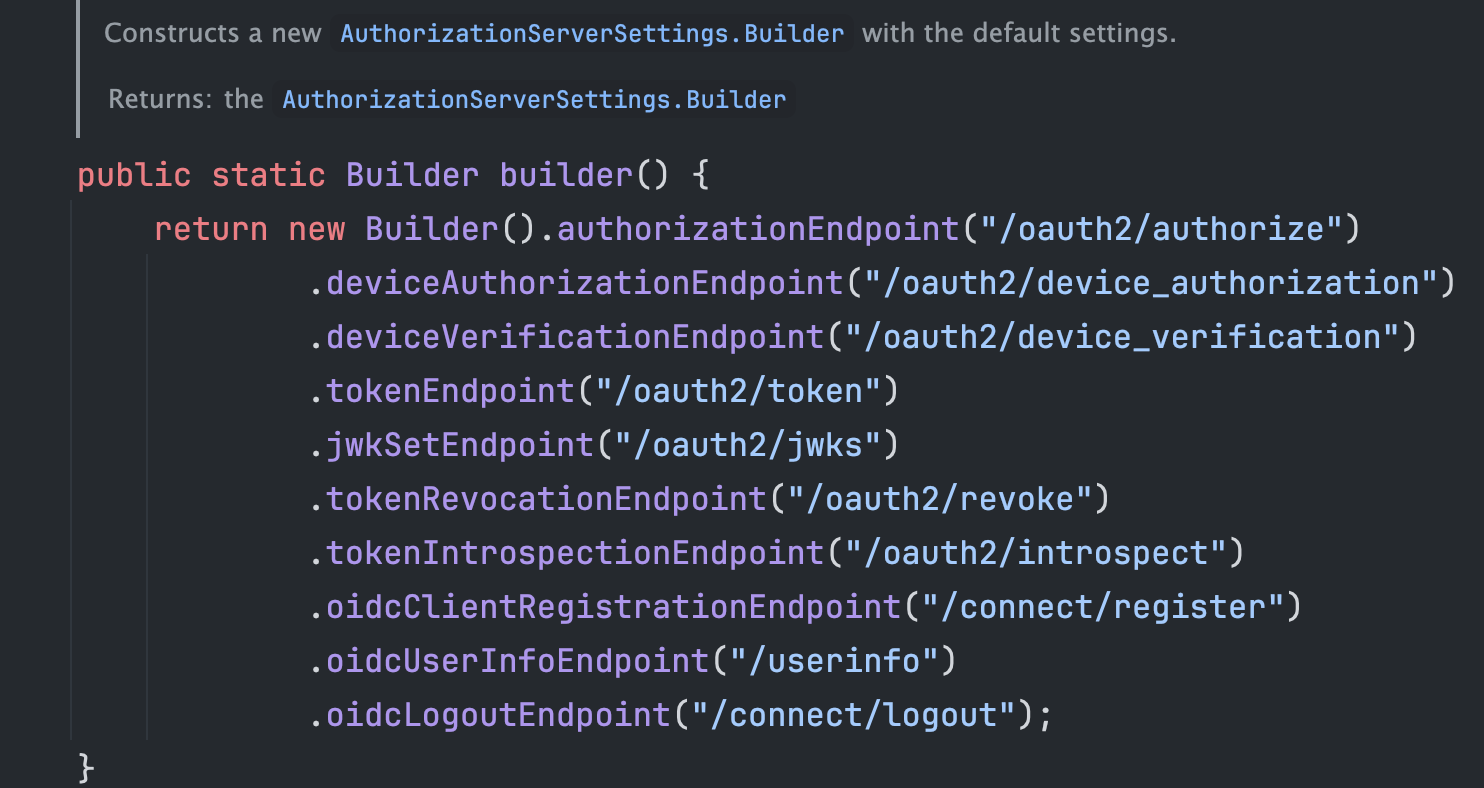
AuthorizationServerSettings.class 는 인증서버의 설정을 할수있는 클래스인데 내부를 보면 Builder에 아래와 같은 Endpoint 들이 있는것을 볼 수 있다.
이는 OAuth2.0 프로토콜을 사용할때 기본적으로 필요한 endpoint 들을 기본적으로 설정해주는것을 볼 수 있다.
이외에도 유용한 Enpoint 는 아래와 같다. 이러한 Endpoint 는 OAuth2.0 Authorization Server 를 구성하는곳에는 존재하는 Endpoint 이다.
/.well-known/openid-configuration
Endpoint 는 OpenID Connect(OAuth2의 확장)에서 사용되며, 인증과 더불어 사용자 정보 등을 포함합니다.
/.well-known/oauth-authorization-server 는
OAuth2 서버에 초점이 맞춰져 있으며, 인증 정보보다는 토큰 발급 및 관리에 관련된 정보만 포함합니다.
OAuth 2.0 서버는 스펙이 매우 방대하고 디테일한 요소들을 많이 포집하고 있기에, 상대적으로 가볍고 커스터마이징하여 운영하고싶다면
spring-authorization-server 는 고려할수있는 하나의 옵션이 될것이다.
다만 기본적으로 제공하는 내용들은 실제 운영에 바로 적용하기에는 부족한면이 있으니 다음 포스팅으로는 간편하게 운영할 수 있을 정도로 커스텀해볼 예정이다.
OAuth Authorization Server - Custom 설정
https://lucas-owner.tistory.com/81
[Spring Boot]OAuth2: Authorization-Server (Custom 인증 서버 구축)(2)
OAuth2: Authorization-Server (Custom 인증 서버 구축)(2)지난 포스팅에 이어서, Spring Security에서 제공하는 spring-oauth2-authorization-server 를 나의 Application에 맞게 수정해 볼 예정이다. Spring Security 에서
lucas-owner.tistory.com
'spring & boot > Spring & Spring Boot' 카테고리의 다른 글
| [Spring Boot]OAuth2: Authorization-Server (Custom 인증 서버 구축)(2) (4) | 2024.11.20 |
|---|---|
| [Spring boot] Spring Boot 3.x^ - Swagger 적용(2) (0) | 2024.11.14 |
| [Spring Boot] WireMock - API Test (0) | 2024.10.29 |
| [Spring Boot]Jasypt 원리 및 사용방법(yml 설정 암복호화, Boot 3.x^) +String Util Class (0) | 2024.08.14 |
| [Spring Security] x-frame-option 헤더 설정(iframe) (1) | 2024.04.03 |


댓글